Assembly Instructions - FC87K and HC87K
This webpage serves as assembly instructions for the Prototype Couplers FC87K, HC87K and Investment Cast couplers. No printed instructions are available. You'll see that assembly of these couplers is more involved that than required for the more common EC87K product. It's a good idea to become familiar with the assembly of the type E EC87KD's before tackling these type F couplers. Don't let this scare you though. Neither of these products are particularly difficult to assemble.
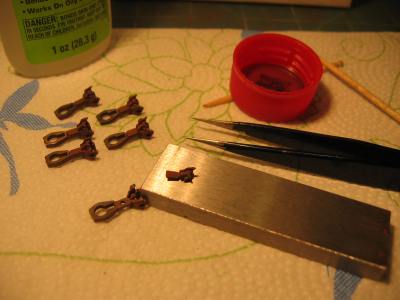
Like other specialty couplers from Prototype Couplers the AAR Type F and Type H couplers are investment cast. You'll notice that the investment castings aren't as clean those that come from the die casting process used for the EC87KD and ENC87KD couplers. Die casting isn't really practical for these couplers because the steel tooling used in that process would be prohibitively complex (and expensive). Investment casting is a great solution for these couplers because the patterns can be arbitrarily complex. The downside is that investment casting is much more labor intensive and therefore more expensive from a part cost standpoint. The investment castings require more clean up and the dimensions of the castings can vary some from one part to the next.
What this means in terms of assembling couplers from investment cast parts is that you'll have to pay more attention detail than you do with the die cast parts. This isn't a huge deal, but do expect to spend more time assembling and checking these couplers than you do with the EC87KD and ENC87KD couplers.
Castings should be painted prior to assembly. Click here to see painting tips.
| The first step in assembling the couplers is to ensure the castings are free of bubbles. Most couplers won't have these, but you should check just in case. Bubbles typically show up at the rear of the thin spot in the shank where the bottom cover goes. They can also show up in the receiving socket on the face of the coupler (see pic). These typically pop off when you attempt to cut them away with a hobby knife. An X acto #16 blade is preferred for this job verses the more common #11 blade because it is much stronger. | 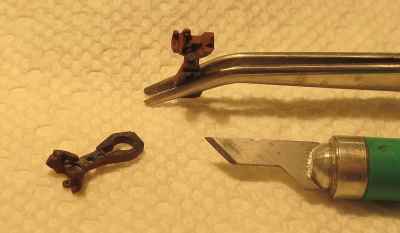 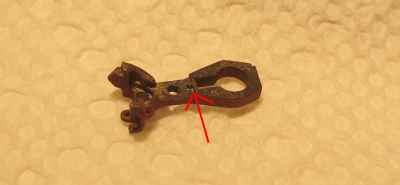 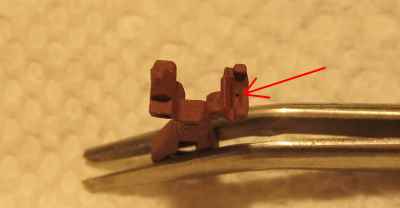 |
|
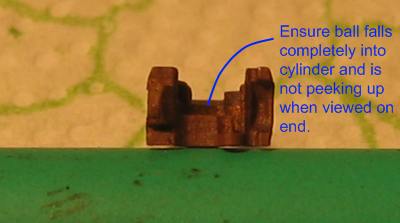
Next, drop a ball into the top casting to ensure that it goes in ok. If the ball doesn't drop completely, DON'T push it in because you might never get it back out. Instead, just turn the casting over and let the ball fall away. Clean the hole out by spinning a cut back toothpick point in the cylinder. Then try again. The sharp end of a hobby knife can usually be used to clean any debris from the hole. If you run into a casting defect where the ball just plain won't fall and nothing will help, then contact us for a replacement casting. |
 |
|
The bottom castings for these couplers are investment cast and are thin where the part is broken from the sprue. Sometimes the casting will bend a little as it is broken away from the sprue. You can straighten these parts by placing them into a top casting and pressing the front tip of the casting down with one thumb while holding the other end with your other thumb. This straightening procedure minimizes the gap in the shank and still allows the coupler to operate reliably. |
 |
|
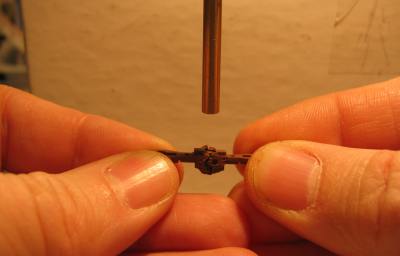
Assembly is pretty straightforward from this point. Just follow the same procedure you have become familiar with for the EC87KD couplers. Left in for Archival Purposes: Note that there is no assembly fixture for these couplers so putting them together can be fiddly. I position the knuckle into place with tweezers, then hold it there with the corner of a scrap metal bar as shown in the photo. I then use the tweezers to put the bottom casting into place. It works pretty well actually. |
 |
|
Give the glue at least two hours to cure. Then its time to lubricate the couplers and break them in. I use an ordinary mechanical pencil (0.5mm) with standard HB (#2) lead. Be sure to get the inside surface of the knuckle and the ears on the side of the coupler. Couplers must be slid over themselves vertically as part of the break in process. You can't do that with two tightlock (type F or H) couplers -- because they lock together vertically. The SEC87 coupler shown in the picture is one I have dedicated to this process. You'll mate that coupler with the tightlock couplers to break in the tightlocks vertically. Click here for more information on the break-in procedure. |
 |
|
Couplers are then tested by hanging an uncoupling wand off a desk lamp. Couple. Uncouple. Repeat. Go through this a few times until you are confident in the reliability of the couplers. The most common problem with the couplers is that they will have a tendency to not lock. If you have a coupler with this problem, push the knuckle closed with your finger and watch to see if the ball falls. If so, then you must be pushing the knuckle further closed that it goes when mating to another coupler. Search for something that is holding the two couplers apart. Some possibilities are...
If the ball won't fall even when you push the knuckle closed with your finger, then the coupler will have to be disassembled to repair it. Things that can cause this sort of problem include...
Coupler disassembly is covered here. |
 |
|
The side view of the couplers can be improved on considerably by filling the joint in the shank with putty. You can give the same treatment to the top of the shank to hide the hole where the post from the bottom casting comes through. You could treat the bottom of the shank as well. I usually don't get excited about stuff I can't see. See Detailing Tip #1 for more info. |
 |
|
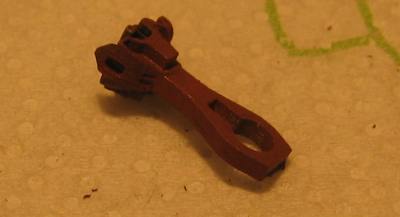
A little paint touchup work and now the shank looks like a single massive hunk of metal! This coupler is now ready to be installed. Be sure to adjust coupler height. That is very important with the tightlock style couplers like this. |
 |